Showing posts with label tech tip tuesday. Show all posts

Tuesday, May 9, 2017

Color Challenged? Solution Provided

Tech Tip Tuesday


Laura is constantly laughing and making faces when it comes to my background and font color choices in presentations or infographics. When it comes to design, I will admit it that I am color challenged. There's just too many choices, and I often like to color outside the box. 😀 

Here are a few extensions and apps that can assist all who are color changed when it comes to presentation designs. All can be found in the Chrome Web Store

Apps:

Color Picker - This site has ads that could be distracting for students. 

Image Color Picker - This one I like. I can load an image that I am using on my presentation and choose a color to use as my background, so that my background and image colors do not clash. Once the photo is loaded onto the site, you can pick a color. Then copy the color code and paste it into your presentation's custom background.

This is a video on how I use Image Color Picker. 


Tuesday, May 2, 2017

Share a Presentation in Google Hangouts

Tech Tip Tuesday

Once again, Google has made it simple and easy. I would recommend adding the Google Hangouts Extension. It makes it super easy for students to connect with other students. 

1. Open Google Drive.
2. Select and open the necessary Google Slide Presentation. 
3. Open Google Hangouts. 
4. Click the Share screen button.
5. Choose how you would like to share: Entire Screen or Application Window. 
6. When you are ready to Stop Presenting, click the Stop button. 


Tuesday, April 25, 2017

Navigating Tips for a Chromebook

Tech Tip Tuesday

Chromebooks are a wonderful tool for the classroom. In appearance, they look a lot like a laptop, but if you look close there are some differences. Here's a few tips to help you and your students navigate while working on a Chromebook.

To Move the Pointer: Move one finger across the touchpad. 

To Select/To Left Click: Tap the the touchpad with one finger. 

To Right-Click: Tap the touchpad with two fingers or hold down the ALT. key while tapping once on the touchpad. 

To Scroll: Move two fingers up and down the touchpad to scroll vertically and left and right to scroll horizontally. 

Move between Open Tabs: Swipe three fingers back left or right to move between all open windows. 

Drag and Drop: Click and hold down the item you want to move with one finger. With a second finger, move the item. Release both fingers to drop the item at its new location.

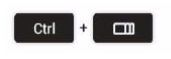
Take a Screenshot: 


Toggle Caps Lock Off and On: 


Delete Key: 


If you have a tip, please share it in the comment box. 

Tuesday, April 18, 2017

I can put Google Draw where?

Tech Tip Tuesday

Laura recently  had a webinar showing all the cool things that teachers and students can do in Google Drawings. She shared ways to create posters, graphic organizers, and interactive activities. But did you know that you can quickly and easily move the entire drawing into a doc or a slide? Here's how: 

1. Begin by opening Google Drawings and creating your graphic organizer, activity, poster, etc. 


2. Click Edit>Web Clipboard>Copy entire drawing to web Clipboard. 
3. Open a Google Doc or Google Slide. 
4. Click Edit>Web Clipboard> Drawing *If more than one is listed, it will show a preview as you hover. 
And PRESTO! Your drawing has been added. 

*FYI: That above interactive math template can easily be made in Google Slides. We will share how to do that in next week's blog.


Tuesday, April 11, 2017

Keyboard Shortcuts for YouTube

Tech Tip Tuesday

Hope you can join us for our YouTube Webinars today. 

EdTech Talks at 4PM


When you log in and if it asks for an Adobe Connect Add-in, you can find that in the Software Center.


And now here are a few keyboard shortcuts for teachers and students to use when watching a video on YouTube that can enhance the viewing experience. 

Space bar or k key = to start and pause video. 

m key = to mute and unmute the sound

down arrow = to decrease volume

up arrow = to increase volume

c key = to turn Closed Caption on and off

f key = to turn Full Screen Mode on and off

l key or right arrow = jump ahead a few seconds

j key or left arrow = jump back a few seconds

0 = to take you to the beginning of the video

5= to take you to the halfway mark of the video (50%) *This works with the other numbers as well. 

If you or your students use any other keyboard shortcuts when viewing YouTube videos, please share them in the comment section. 

Tuesday, April 4, 2017

GSuite Training is SWEET!

Tech Tip Tuesday

While EdTech with Howard and Feck has shared this seriously sweet training tool from Google in their face-to-face trainings and webinars, I couldn't believe that we hadn't blogged about it. Well, wait no longer; here it is.

G Suite Training is an absolutely free must have extension for all Google users. It is interactive training that walks users step by step on how to set-up and use Google Docs, Slides, Sheets, Forms, Drawings, AND Classroom. 
What's great is this tool should already be available for use on the school chromebooks. If you cannot see the extension icon located in the top right- hand corner of a doc, slide, form, drawing, sheet, or classroom, just follow these easy steps to add the extension:

Go to Chrome Web Store>Search: G Suite training> click the blue Add to Chrome Button> Allow for extension to be added> Open a Google App Product and begin training. 

Example of what it will look like once activated in Google Classroom.

Check out all the short interactive training videos offered for Google Classroom
Learning how to use Google Apps like Docs, Slides, Forms, Sheets, Drawings, and Classroom has never been easier for teachers or students. 

Tuesday, March 28, 2017

Google Classroom - Add-ons and Extensions

Tech Tip Tuesday

Google Classroom offers so much more than just helping classes go paperless. It is a tool that fits perfect with TTESS since it's all about the students. Google Classroom can store vital classroom resources, is appropriate for diverse learners, and offers students a way to think critically, be creative, collaborate, and communicate. 

Here are a few extensions and add-ons to help teachers and students get the most out of Google Classroom. 


Share to Classroom is a Chrome extension that makes it easier for students and teachers to share web sources with each other. 


These next add-ons and extensions are from Alice Keeler. If you haven't visited her website, do so now. It is a must. She is a Google Classroom guru. Mrs. Keeler has also co-written two books on everything Google Classroom. When she realized Classroom didn't do all that she needed it to do for her and her students, she learned to code and started scripting add-ons and extensions. Here are a few that are specific to or work well with Google Classroom. 

Extension: 
Screen Split - It will split the Google Classroom and student work into side-by-side screens enabling students to view assignment directions and resource links while working. 
QuickShare - Screenshot: Enables teachers to quickly give feedback to students. 

Add-On: 
RubricTab - *Mrs. Keeler also has a rubric template that can be used with this add-on. 
Group Maker - Randomly assigns students to groups. 

Don't forget to join us for one of our webinars today featuring Google Classroom. 
4 PM EdTech Talks - saisd.org/edtechtalks 
7 PM PD in your Pajamas - saisd.org/pdinyourpjs

Tuesday, March 21, 2017

Adding Extensions and Apps in Chrome

Tech Tip Tuesday


Thank you to all who have been participating in our webinars that we began in November. We now offer two regular sessions ever Tuesday and Thursday at 4 PM (EdTech Talks) and again at 7 PM (PD in your Pajamas). In April we will not only offer our Tuesday and Thursday webinars, but are adding a few more on Mondays and Wednesdays at 4 PM. 
Be on the lookout for our April Newsletter coming out on Friday. The Newsletter will list all our available webinars in April. 
In our webinars today, participants looked at all the wonderful features that Chrome contains. Two features we explored were Chrome Apps and Extensions. 
Chrome Apps are web applications that run in Chrome. Almost like a quick link to the website. Apps are added to the Apps button on the bookmark bar located under the omnibox. 
A Chrome extension is something that adds functionality to a website or Google product. Extensions are placed to the right of the ominibox.

Here's how you can find and add extensions and apps to Chrome. 
1. Open Chrome and log-in to your SAISD Google Account. 
2. In the omnibox search for the Chrome Web Store. 
3. Once in the Web Store, you can search for extensions or apps by typing a key word in the search box or searching through the categories. 
4. Once you locate the app or extension you want, click the blue Add to Chrome button. 
5. A box will pop-up asking if you really want to add the app or extension. Click the  Add Extension or Add App button.

Here's a few that we recommend taking a look at: 
  • goo URL shortner - extension
  • Google Keep - app and extension
  • Google Classroom - app
  • Share to Google Classroom - extension
  • Print Friendly &PDF - extension
  • Screencastify - extension
  • Google Tone - extension
  • Kami - app and extension
  • Google Hangouts - app and extension
  • Read & Write for Google Chrome - extension

If you have an app or extension that you have added and just love, please tell us about it in the comment section. 


Tuesday, March 7, 2017

Keep Google Doc Comments in Google Keep

Tech Tip Tuesday


Google Keep is a wonderful way to store your lists and notes. The comment feature in Google Docs is an effective feedback tool. Now that Google Keep is integrated into Google Doc, you can store a list of your comments in Google Keep and use them when needed in Google Docs.  Here's how it works:
1. Create your List of Comments in Google Keep
  • Go to keep.google.com to open the program. 
  • Create a new list
  • Create a Title for your Comments List. 
  • Type in your comments. If you already have comments in Google Docs, you can copy and paste those into your list. 
  • Create a label for your new list so you can quickly find it in Google Docs. 
2. Add your comments to Google Docs.
  • Open the Google Doc that needs feedback.
  • Click Tools>Keep Notepad - A panel will open on the right side of the screen. 
  • Click Search>Type in the title or label of your list - That list will now show in the panel. 
  • Open a Comment Box in the Student's Google Doc. 
  • Find the comment you need in the Google Keep Panel and copy and paste it into the Google Doc comment box. 

In the end, the combination of these tools will not only be a time saver to teachers, but also help provide a quick way for teachers to give meaningful feedback to students. 

Tuesday, February 28, 2017

Okay Google and Google Tone

Tech Tip Tuesday

Here are two more Google products that make it easier to use Chrome in the classroom.


Okay Google lets students use their voice to search.

Make sure students are signed into their chrome account. Check that the Chromebook or iPad microphone is enabled and on. Go to google.com, look for the picture of the microphone in the search box and say, "Okay, Google" and whatever the student needs to search. This is a great tool for younger students.
Visit Google Help Center for directions on how to enable Okay Google Voice Search for an iPad or Android.

Okay Google on a Chromebook: 


Google Tone is an extension that once enabled it turns on your computer's or chromebook's microphone and broadcasts a URL(web address) to other computers in the room.  Click here to see how to add the extension and how Google Tone works.


Tuesday, February 21, 2017

Insert Non-YouTube videos into Google Slides

Tech Tip Tuesday


You can now insert non-YouTube videos onto slides in Google Slides. Here's how: 

1. Open Google Slides
2. Click Insert>Video>Google Drive
3. Search for the video that you saved on your Google Drive. 
4. Click on the Video>Select.
It's that easy. 

Don't Forget: 

Day #9 Twitter Challenge: 
You have some rock star colleagues! Tweet out something a colleague is doing in teaching that you want to know more about or you think should be shared!
Tag it with the person's Twitter handle and also use #sanangeloisdtweets17.


Digital Learning Day: 
Add your digital learning event or activity at Digital Learning Day
Be sure to check out their digital tools, resources, and activity ideas

Tuesday, February 14, 2017

Emojis in Google Docs

Happy Valentine's Day

Twitter Challenge Day 2: Reply to someone who used #sanangeloisdtweets17 in a tweet yesterday & introduce yourself. Include #sanangeloisdtweets17 in your reply.

Tech Tip Tuesday: 

Emojis are a fun way for students to retell a story, design a pictograph, create a visual summary for a science experiment or historical event, or create a word problem with visual variables . 

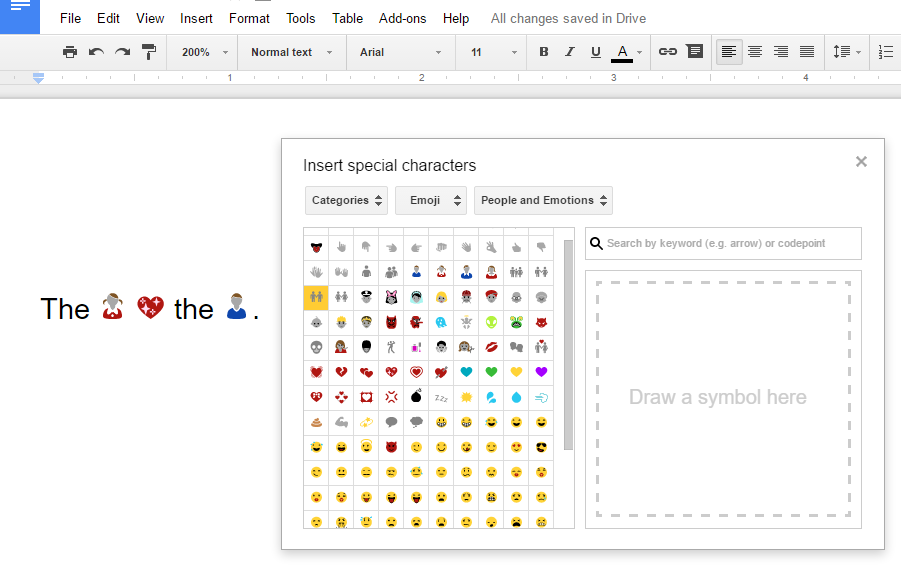
To insert an emoji: Open a Google Doc>Insert>Special Characters>Choose Emoji from the drop down menu> 
Choose the Type of Emoji>
Click on the emojis you would like to insert.

Working with Emojis: An emoji in Google Docs is not an image, so you can't crop, rotate, or drag the handles to resize. Since an emoji is considered text, you must use the text tool features. Copy, cut, and paste or drag and drop to move the emoji in the document. To resize the emoji, select it and choose a font size from the font toolbar. 
Emojis are easy and fun to use in Google Docs.

And who knew that using this tool could also help prepare your students for a future job. I recently read an article in which a firm is seeking to hire an emoji translator. That's right an emoji translator. It seems that the emoji is the fastest growing language in some places. 

Tuesday, January 31, 2017

More Grading Options for Google Forms

Tech Tip Tuesday

Last week, we shared how to turn your Google Form into a Multiple-Choice Quiz that will automatically grade and compile the results in Google Sheets. 

What if you want to design a quiz or an assignment to be multiple choice/short answer or nothing but short answer questions? Can that be easily graded? Yes, with Flubaroo or Super Quiz, two add-ons in Google Sheets. 

Flubaroo is a free add-on that gives teachers the power to quickly grade and analyze multiple choice or fill-in the blank quizzes or assignments.
Check out the Help Center to find out how you can grade short answers with more than one word, grade answers that are case sensitive, or add a digital sticker. Use the easy 5-step Guide to show you step-by-step on how to create and grade an assessment or assignment.

Super Quiz is free add-on that is so much more than just grading and receiving results. It offers real-time grading meaning you don't have to wait for all students to take and submit the assignment or quiz before grading. It breaks down the scored data in a variety of ways and automatically creates a tab for each data view in a google sheet. Super Quiz also creates a tab that enables teachers to give students, either through print out or email, feedback and suggestions on what they should do next after taking the quiz or completing an assignment.  
View this tutorial video to help you start using Super Quiz today. 

Tuesday, January 24, 2017

Automatically Grade Multiple Choice Quiz with Google Forms

Tech Tip Tuesday

Google Forms and Sheets have made test taking more convenient with easier grading and easier data collection. 

Follow these steps to turn a Google Form with multiple choice questions into a quiz that automatically grades. 

 1) Open Forms
 2) Add a Quiz Title and Description (directions). 
 3) Click Settings > Quizzes. Toggle the top button to "Make this a quiz."
 4) Fill out all the necessary Quiz Options and Click Save. 
 5) Create your multiple choice questions and answers. Assign a point value to each question by clicking on Answer Key
6) Share a link or Send the quiz to your students to complete. 

As your students take the assessment, click the Response Tab to see the quiz results. For further data analysis, open the quiz responses in a google sheet with one click of a button. Under the Response Tab, locate the Google Sheet and click. 

Next week, I'll share two add-ons for Google Sheet that make grading a short answer quiz as easy as pie. 


Tuesday, January 17, 2017

Tips for Submitting Tech Badge Evidence

Tech Tip Tuesday

The SAISD Tech Badge program is in full swing. We would like to thank all of those who have been participating and encourage the others who have not started yet to join the learning and fun. The Tech Badge program is a fabulous way to show fellow co-workers, parents, students, and administrators what technology tools you and your students use in your classroom to broaden learning experiences.

Here's just a few suggestions for submitting evidence to help you receive your tech badge(s):

Google Classroom: Send your class code, so that we can join the class and view all classroom materials, assignments, or discussions. 

Google Docs, Slides, Forms, Sheets, Draw: Share the document with view only rights. 

Microsoft Word, Excel, PowerPoint, Publisher, Sway: Send as an email attachment or share view only rights through your Microsoft One Drive. 

Want the Microsoft One Drive or Google Drive tech badge? Use Window's Snipping Tool to snip, copy, and paste a pic of your drive into an email. 

Kahoot: Email or include the following information in the request badge form: the name of the kahoot and your username. 

Video Creation with Screencast, Screencastomatic, or Powtoon: Screencast you can save and share using your Google Drive or link to your Google Classroom. Screencast-o-matic and powtoon can be uploaded to your SAISD YouTube Channel or send us a custom link. 

And always remember, we love pics, pics, pics. Take and email pictures of your students working on an interactive Smartboard or Mimio activity. Take and email pictures of your classes Skype session with another class. 

And never forget that EdTech with Howard and Feck is always here to answer any of your tech badge questions.


Tuesday, January 10, 2017

Don't Miss These Google Form Tips

Tech Tip Tuesday

We all know that Google Form is an effective tool to use in the classroom. Google Form is great for collecting data from surveys, assessments, exit tickets, or questionnaires. It's a tool that can also be used for journal writing, creating stories, or as a substitution for a classroom worksheet. Data collected from the Forms are quickly compiled and placed into a Google Sheet with one click of a button. 

Pictures can be added to questions or individual answer choice. YouTube videos can easily be added into Google Form. 
Here's how: 

Google continues to add to their products taking suggestion from Google Users. Recently, they added a new feature to Google Forms. Form creators can now add an Upload File Question to a Google Form which allows SAISD employs and students to upload files to the form owner's google drive. Here's how: Upload a File Question

Add-ons in Google Form  add more functionality making this digital tool even more effective to use in the classroom. 
Here's how: 

Tuesday, January 3, 2017

Connect Google Drive to Your Laptop or Desktop

Tech Tip Tuesday


We all want an easier way to move and copy files from our computer to the cloud - Google Drive Sync makes that happen. Simply install Google Drive Sync from the Software Center (icon on your computer) to your desktop or laptop and then select what files to sync. This will make moving and copying files so much easier.

After the install is complete, open Windows File Explorer and you'll see your Google Drive listed in Favorites or Quick Access. To move a file from your computer just drag it to the Google Drive folder. To copy a file, hold down the Shift key while you drag the file.


An added bonus - changes you make while working in Google Chrome will automatically be made in your Google Drive housed on your desktop or laptop.

The video below will take you step-by-step on how to add your Google Drive onto your desktop and/or laptop. This will make moving documents from your SAISD I:drive and saving documents and images from an Internet search easier and faster.


*If you are unable to locate the Google Drive Sync in Software Center, please contact the Help Desk for further assistance. 

Tuesday, December 13, 2016

Edit Office Documents in Drive

Tech Tip Tuesday

You don't have to install Office to edit your Microsoft Word documents, Excel spreadsheets, or PowerPoint presentations. 

The following instructions are from G Suite Learning Center.
If you’re using a Chromebook or the most recent versions of the Docs, Sheets, and Slides apps on your phone or tablet, you can already edit Office files!
If you’re using a computer
  1. Download the Office Editing for Docs, Sheets & Slides Chrome extension.
  2. From Google Drive, double-click any Office file to start editing.

G Suite Learning Center offers tutorials and tips on many Google App products. You can even download cheat sheets. Check out this Google Doc cheat sheet. 

Tuesday, December 6, 2016

Save it as a PDF

Tech Tip Tuesday


There are a few advantages to saving documents and files as PDF. First, anyone, no matter the device used, can open a PDF. Second, it freezes your formatting and layout. Third, with programs like KAMI users can still annotate on the document while the original stays in its original format. 


To save a Microsoft Document as a PDF: Click File> Click Save As> Choose the Storage Location> File Name: Name your Document> File Type: In the drop down menu choose PDF> Click Save

To save a Google File as a PDF: Click File>Download as>PDF Document(.pdf)

It's that easy!

Tuesday, November 29, 2016

Caring for your ipad

Tech Tip Tuesday


Here are some tricks and tips to get the most out of your ipad. 

1. Quick Recharge: Put your device on airplane mode, and it will charge twice as fast. 

2. Keyboard Click: To turn off the sound of the keyboard click, go to Settings>Sounds>Keyboard Clicks. Slide the button to off and your done.

3. Split Keyboard: Sometimes students when typing will accidentally swipe two fingers across the keyboard and it will split. To bring it back together have them place a finger on each side of the keyboard and swipe their fingers together back to the middle. 

4. Space Needed: To see how much space is available on your device, go to Settings>General>Storage & iCloud Usage. The fastest way to free up space is to delete photos and videos. It's also advisable to free up space by deleting apps that you are no longer using. Deleting apps are easy and can be done from your home screen. To delete an app, hold your finger down on the app icon until all the icons on the screen start wiggling. Next, tap the cross on the top-left corner, and you'll be asked if you want to delete it. Press delete. You can delete as many apps as needed. Once you are finished deleting apps that you don't need anymore, press the home button and the icons will seize wiggling. Don't forget that if you need the app back, you can download it from the app store just click on purchased to find it. 

5. Organize: You can organize your home screen by creating folders for your apps. To create a folder, hold your finger down on an icon until they start wiggling and then drag one icon on top of another. It will group them together. From here you can name your folder. To add more icons to the folder, just repeat the step above.